To use the AI driver face recognition function, you need to meet the following prerequisites!
Models with built-in AI algorithm (authorized, algorithm running normally, DSM enabled)
Set up an FTP server and open the port so that the IP test device can access it (the account used to access the FTP server is known)
Insert a storage medium (HDD OR SD) that can be correctly recognized by the device
Insert the DSM camera and configure the parameters to make it appear on the screen
Steps:
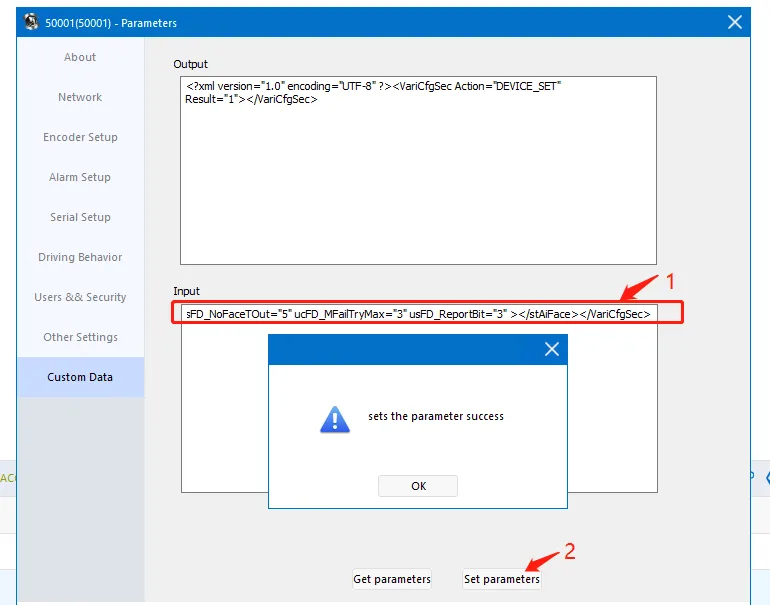
1. The platform issues instructions to enable and configure relevant AI driver face recognition parameters.
Send parameters:
<VariCfgSec Action="DEVICE_SET"><stAiFace ucFD_Enable="1" ucFD_FaceVChn="2" fFD_Similar="0.75" usFD_MOkTOut="60" usFD_MFailTOut="10" usFD_NoFaceTOut="5" ucFD_MFailTryMax="3" usFD_ReportBit="3" ></stAiFace></VariCfgSec>
<!---Parameter Annotations:
ucFD_Enable="1" 1 means on, 0 means off
fFD_Similar="0.75" indicates the similarity threshold, it is recommended to keep the default 0.75
ucFD_FaceVChn="2" means using the third channel, which is configured according to the actual situation, that is, the video channel facing the driver (DSM camera)
usFD_MOkTOut="60" indicates the next comparison interval after successful comparison, in seconds
usFD_MFailTOut="10" indicates the next comparison interval after the comparison fails, in seconds
usFD_NoFaceTOut="5" indicates the next comparison interval when no face is found in the channel, in seconds
ucFD_MFailTryMax="3" indicates the number of failed face comparison attempts. If the number exceeds the number, the platform will alarm. For example: usFD_MFailTOut=10s 10*3=30, which means 0.5 minutes for alarm and capture.
usFD_ReportBit="3" means TTS reminder and screen display; 2 has no hand mic sound, TTS sound and screen display; 1 has hand mic sound, but has no TTS sound and screen display; 0 has no display. -->
2. Add face pictures to the device in two ways: FTP server download & access device WEB addition
2.1 FTP server download added
2.1.1 Place a face picture on the FTP server and remember the path and picture name (the corresponding face file should not exceed 512KB. You can take it with your mobile phone, take a screenshot of the face, and save the file in .jpg format)
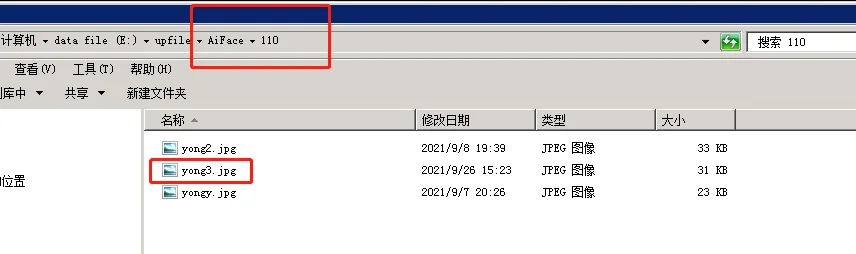
2.1.2 The platform issues the following instructions to add images to the face database (delete the content including "" and fill in the correct parameters)
<Control><CmdType>FaceDBAdd</CmdType><SN>11</SN><FaceID>"Fill in the face ID without repeating it, for example 00001"</FaceID><FaceName>"The name of the person corresponding to the face ID" </FaceName><WhiteFlag>1</WhiteFlag><FaceFile>FTP="Fill in the FTP service IP","Fill in the FTP service login user name","Fill in the FTP service login password","Fill in the FTP service registration Port","fill in the FTP service image storage path. Example:/AiFace/110/yong3.jpg",230400,230400,0</FaceFile></Control>
2.2 Device WEB addition
2.2.1 Use a browser to access in the same network environment as the device (you can use the local IP address of the wired access device or connect to the device hotspot to access 192.168.42.100), click the menu to add a face as shown below, and the person is in the center of the frame Enter the number, name, and type and click Save. You can refresh the browser to update the screen correction.
 >>
>>>>
3. Restart the device to start using the face recognition function, as shown below:
- A "Please complete face recognition detection" dialog box pops up on the screen with a voice prompt.
- Complete face recognition detection with the center of the face facing the DSM camera
- "Face recognition detection successful" pops up on the screen and sends a recognition success alarm to the platform's active security real-time alarm menu
4. Other parameter descriptions:
- Obtain the face database configuration of the device. After execution, the device will upload the FaceDatabase.xml file in the device to the specified FTP (for example: 139.9.251.220) path, such as /AiFace/30057
<Control><CmdType>FaceDBGet</CmdType><SN>11</SN><Ftp>FTP="FTP ip","FTP username","FTP password","FTP port","ftp path"< /Ftp></Control>
- Delete device face library pictures
<Control><CmdType>FaceDBDel</CmdType><SN>11</SN><FaceID>"Face ID"</FaceID></Control>
- Query configuration parameters
<VariCfgSec Action="DEVICE_QUERY"><stAiFace /></VariCfgSec>