Introduction
This chapter will introduce the definition of the rear panel interface and front panel slot of our car-mounted MDVR series!
M51HV/52HV interface definition:
Back panel
Instructions for use: The upper left corner is the IO expansion cable insertion port. Use the matching IO harness with the notch facing down and press the buckle below to insert. The middle is the HMIC hand mark extension insertion port. Use the matching hand mark harness + hand mark (not standard). On the right are the GPS, 3/4G, and WIFI antenna sockets. Use the matching GPS, 3/4G, and WIFI (not standard) antennas to insert and tighten clockwise. The upper right corner is the POWE power input port. Use the matching power cable with the notch facing up and tighten clockwise, as shown below.
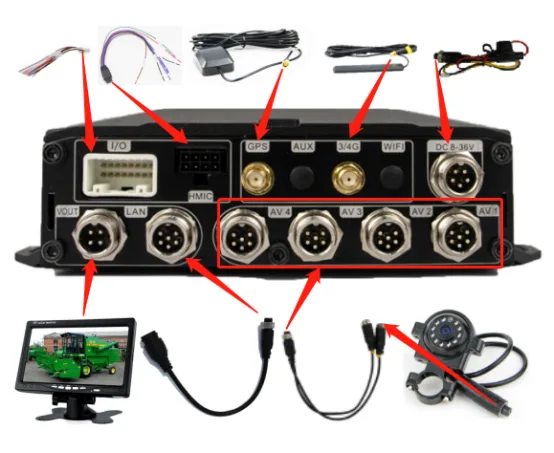
The lower left corner is the display input port, four-core is for CVBS screen, five-core is for VGA screen, the middle is the network port adapter cable insertion port, use the matching network port adapter cable (not standard), the lower right corner is the AV1-4 camera insertion port. Here, take the M52HV model as an example, the five-core port needs to be inserted into the matching one-to-two adapter cable and then the camera is inserted into the four-core port of the adapter cable. If it is the M51HV model, AV1-4 is a four-core camera that is directly inserted, as shown above.
Front panel
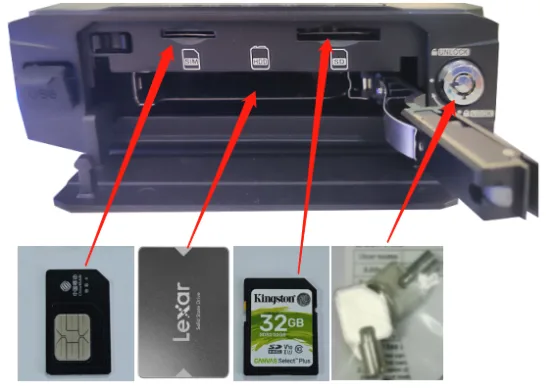
Instructions: The right side is the switch lock. Use the matching key with the notch facing down and gently press it. Turn it clockwise to the horizontal notch on the left to unlock it. Press the "PUSH" indicator to open the door. The inner test is the SIM card, SD card, and hard disk insertion port. Use the SIM (large card) and SD card to insert the notch to the right. Pull open the hard disk push cover at the finger mark position. Use the 2.5-inch hard disk (SSD OR HDD) with the notch facing down and insert the hard disk push cover again. After completion, close the door upwards and use the key to turn it counterclockwise to the vertical port to lock it. The left side is the USB port for inserting U disk and other media to upgrade firmware, import configuration, etc., as shown above. Ps: All devices must work in the locked state